Core Image【3】—— 2017 新特性

Core Image 系列,目前的文章如下:
如果想了解 Core Image 相关,建议按序阅读,前后有依赖。
对应源码,见最末链接。
概述
先回顾一下 Core Image 目前强大的功能。
- A simple, high-performance API to apply filters to images,提供简单使用,性能优秀的 API,以及内置各种 CIFiter,方便处理图片
- Automatically tiles if images are large or graph is complex,大图处理优化
- Automatically tiles if only a region of the output is rendered,只处理部分区域
- Each CIFilter has one or more CIKernel functions,自定义 CIFliter
- Multiple CIKernels are concatenated to improve performance,滤镜链延迟处理,合并成一个
这几点之前的文章都详细描述过了,这里不再说明。
2017 年,额外引入了一些新的东西,具体如下:
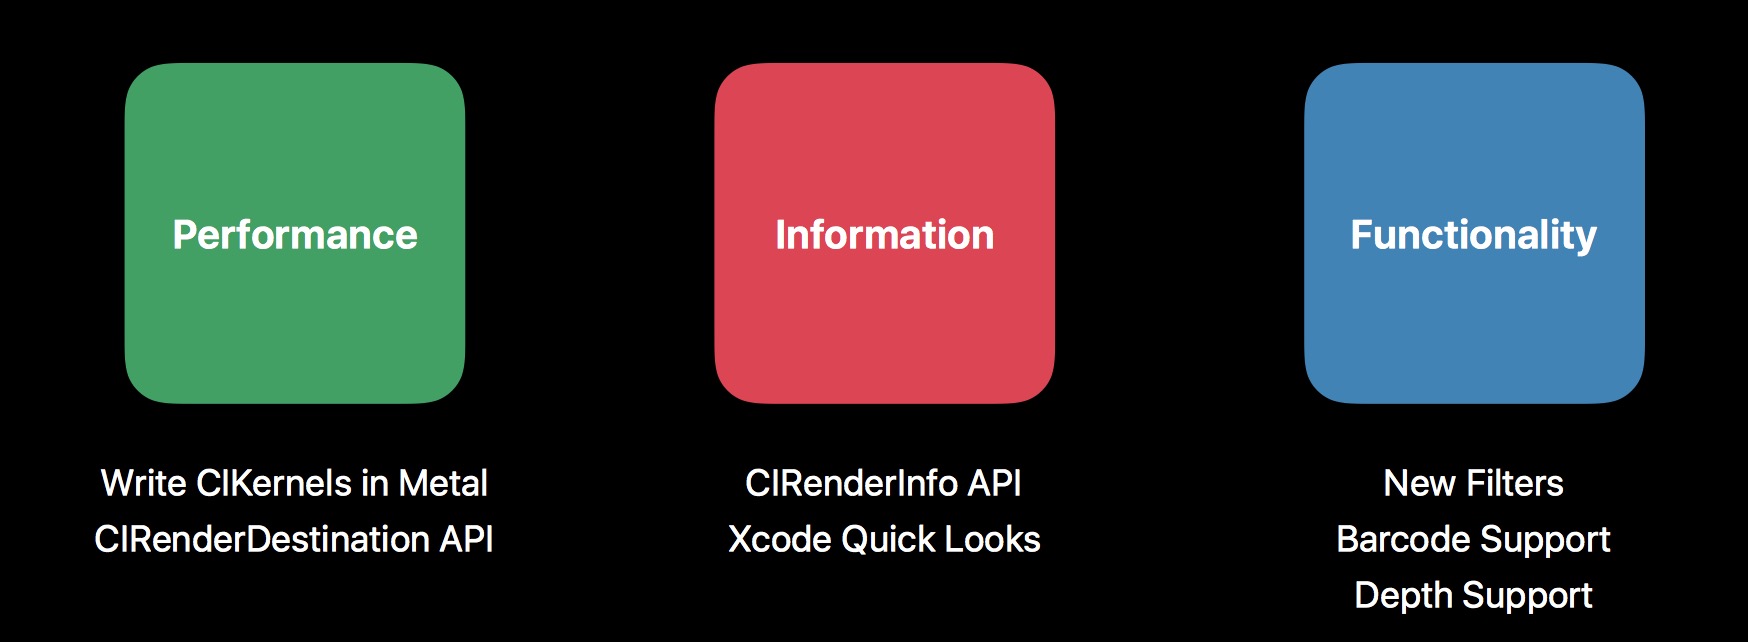
从三个方面讨论,性能,调试信息,新功能。
性能:
- 支持使用 Metal 直接自定义 CIKernel,提高效率
- 引入 CIRenderDestination,更方便,性能更好的渲染到指定目的地
信息:
- CIRenderInfo,包含更多的信息
- Quick Looks,支持 Core Image 多个对象直观调试
新功能:
- 更多内置滤镜
- 条码扫描支持
- 与不同框架的协同处理
下面逐一展开说明。
性能
Metal
先回顾旧的 CIKernel 编写方式,之前的文章也提到过,Core Image 支持自定义 CIFilter,它们的脚本是通过 CIKernel Language 编写的, CIKernel Language 又基于 GLSL。
所以,当我们运行 App 时候,要用到这个 Filter,那么系统会自动帮我们把对应的 kernel,翻译成 GLSL 或者 Metal 规范的 kernel。然后再编译得到的 kernel。
所以之前的方式,存在两个问题:
- 编写 kernel 的时候,没有报错提示,哪怕是参数名错误都无法检查处理。效率极低。
- 翻译转换,编译,都是发生到运行时,导致第一次使用滤镜的时候,耗时较久。
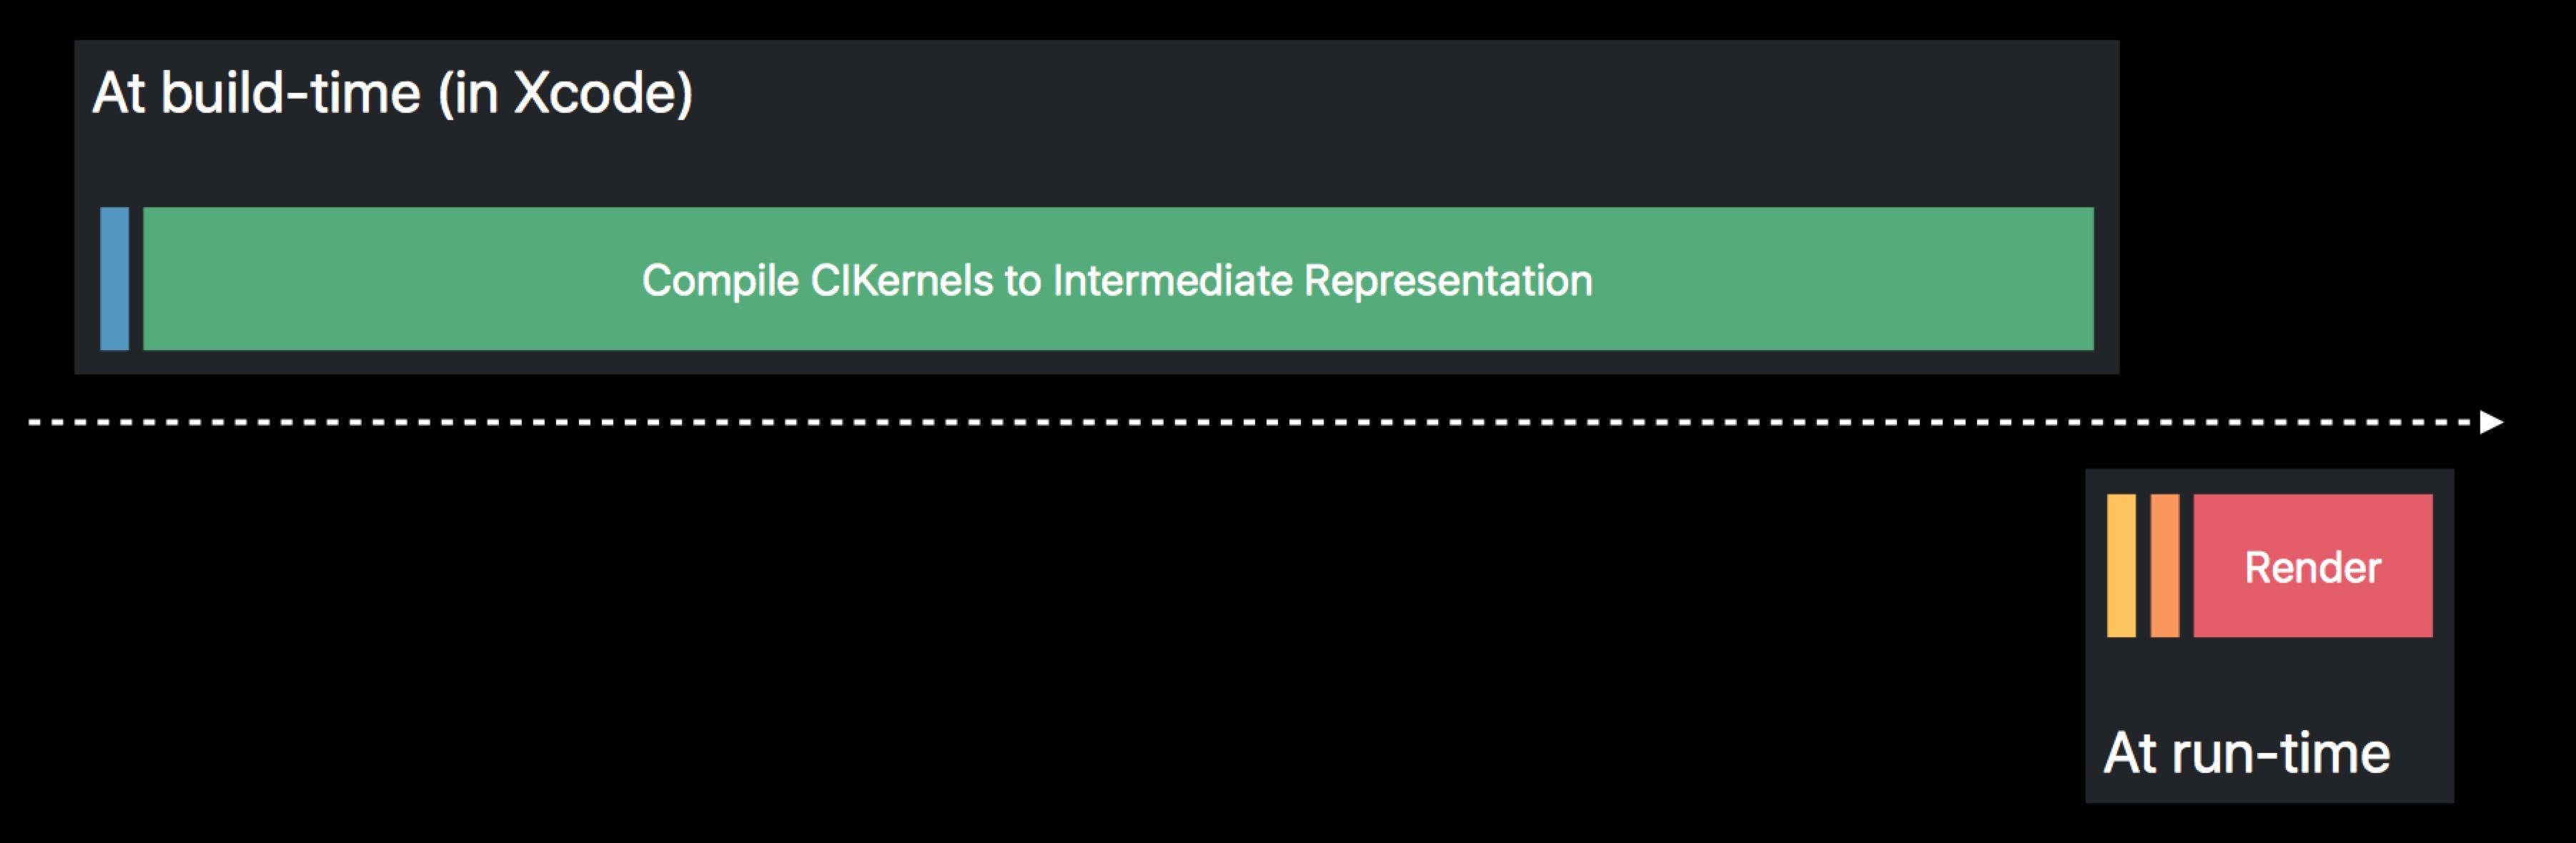
关于耗时这点,具体如下:

这里的各个阶段分别指:
- Translate CIKernels,转换 kernel,转成其他格式的。
- Concatenate CIKernels,按序连接 kernel,滤镜链里头提到过
- Compile CIKernels to Intermediate Representation,编译 CIKernel,这里的 IR(中间代码)我们无需关心,也干预不到
- Compile to GPU Code,将 IR 转成 GPU 识别的代码
- Render,在 GPU 上渲染
在旧的模式里面,这五步都是发生在运行时,且无法避免。
CIKernel 编译后会有缓存机制,所以耗时第一次较为明显。
这就导致了一个问题,你可能只需要渲染一次,显示带效果的图片。但是哪怕你的图片很小,也需要相当久的等待,因为需要对 CIKernel 进行转换编译。
进一步拆分,必须发生在运行时的,包含 Concatenate CIKernels,Compile to GPU Code 以及 Render,因为拼接滤镜可能是动态的,没法一开始就确定下来。

而占大头的前两部,并不是一定需要在运行时才能处理的。Metal 恰恰能解决。
将 Kernel 的编译时间,提前到 App 编译阶段,并且有语法错误检查,大大提高效率。
那么,具体怎么用 Metal 编写 CIKernel 呢,对比旧的流程,有什么差异呢?下面举个实际例子。将上一篇文章里面实现的 Vignette, 改用 Metal 处理,便于参照。
Write CIKernel in Metal shader file
CIKL(CIKernel Language) 和 Metal 本质上是很相似的,基础语法都是一样的。
关于语法类的东西,这里不细说,具体可以参照官方说明来。MetalCIKLReference
这里提一点。CIKL 之前为了特性,扩展的那些支持, Metal 也同样支持。具体的转换规则如下:
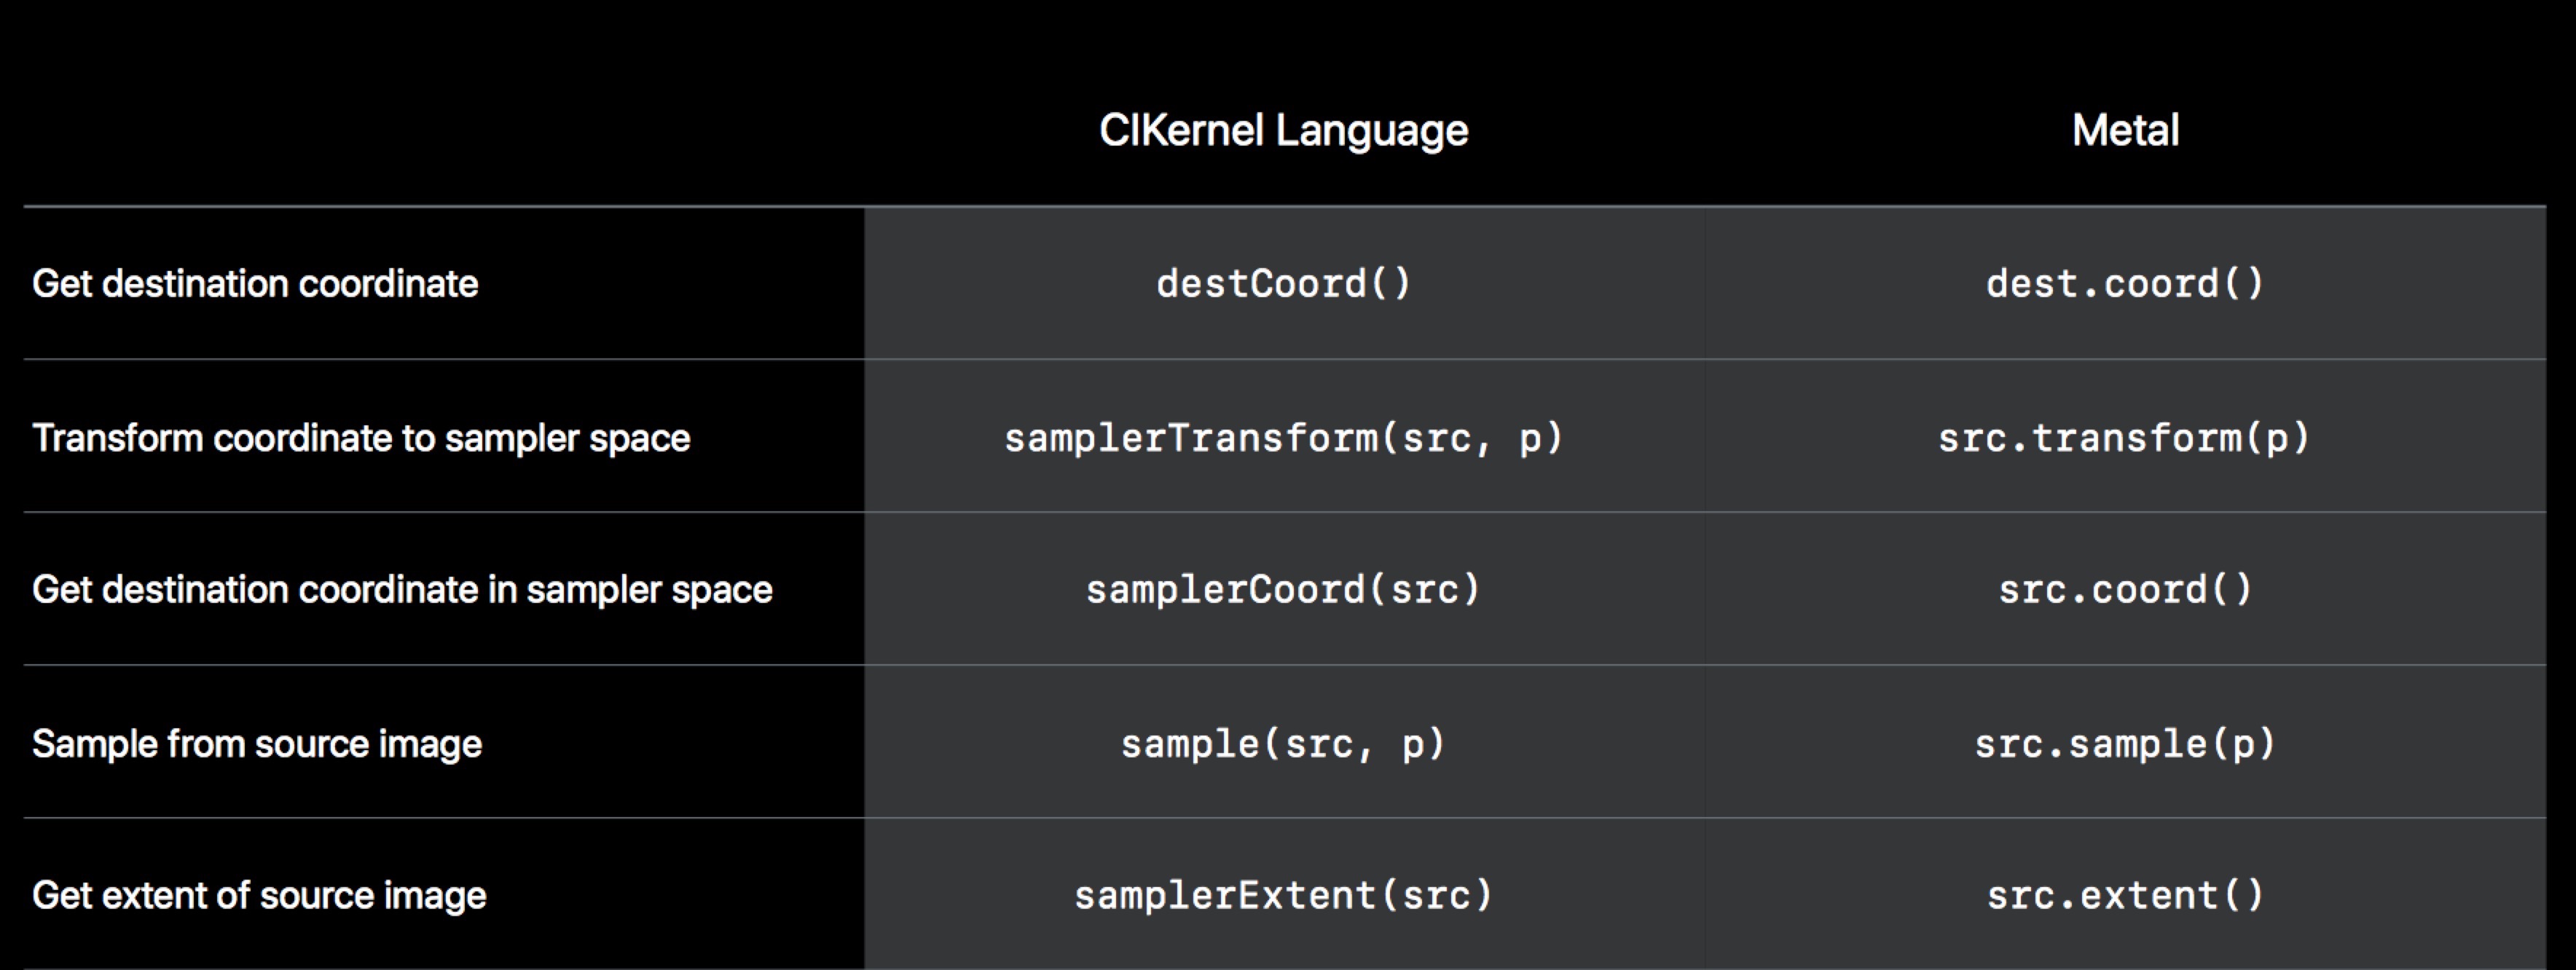
所以不同类型的 CIKernel,它们的简单转换应该是这样:
CIWarpKernel:
CIColorKernel:

CIKernel:
基本上,差异都体现在额外扩展的这些内容。实际的算法编写,基本不变。
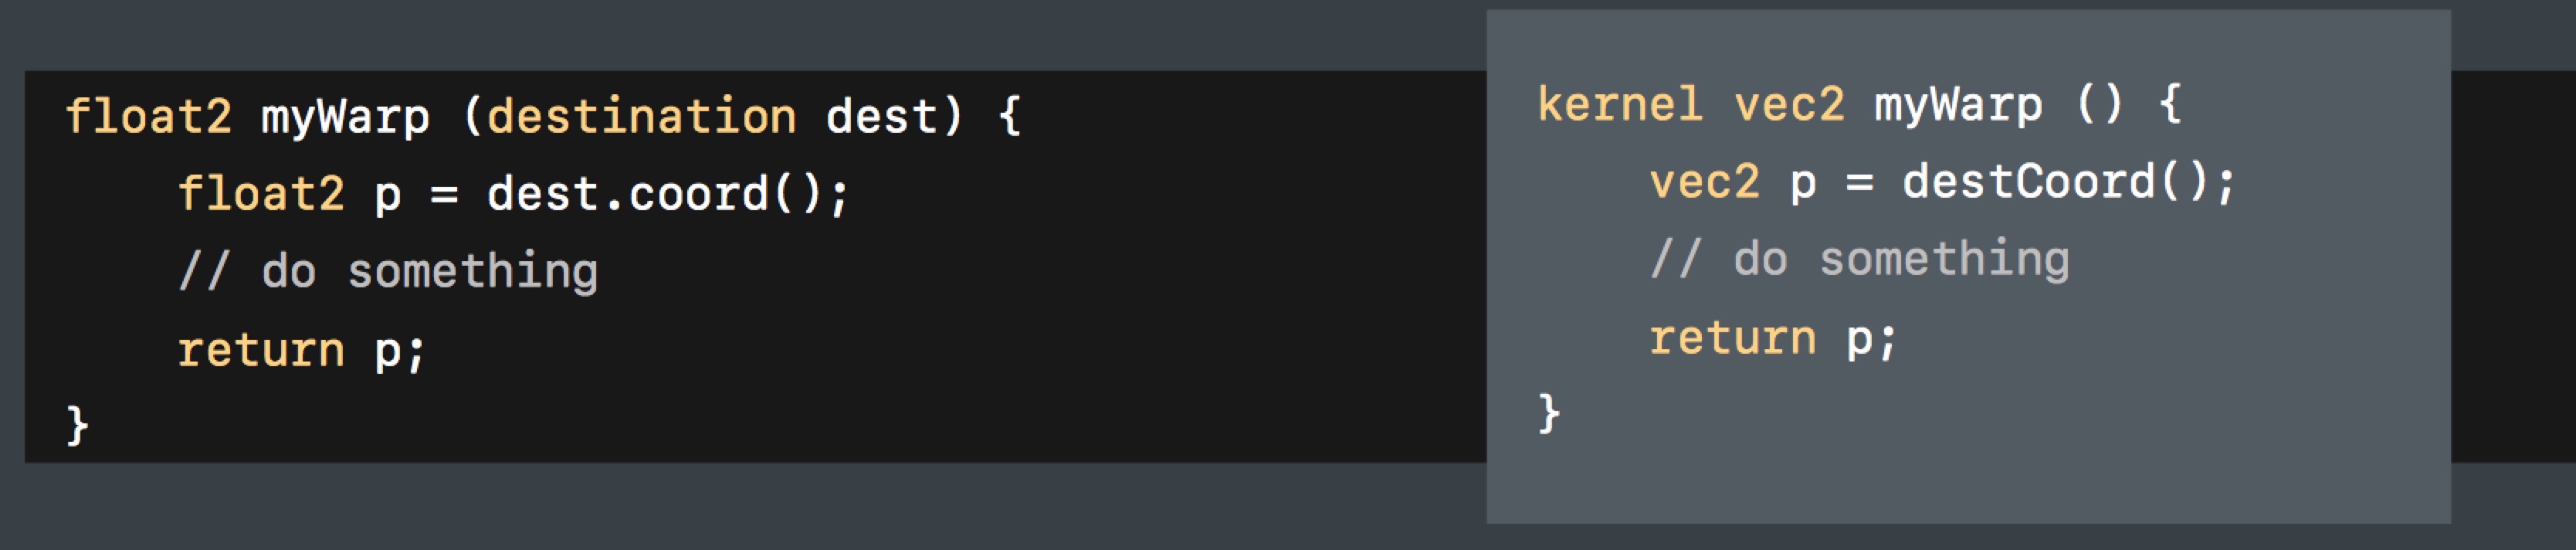
我们以之前实现的 vignetteKernel 为例,Vignette.cikernel 白板代码如下:
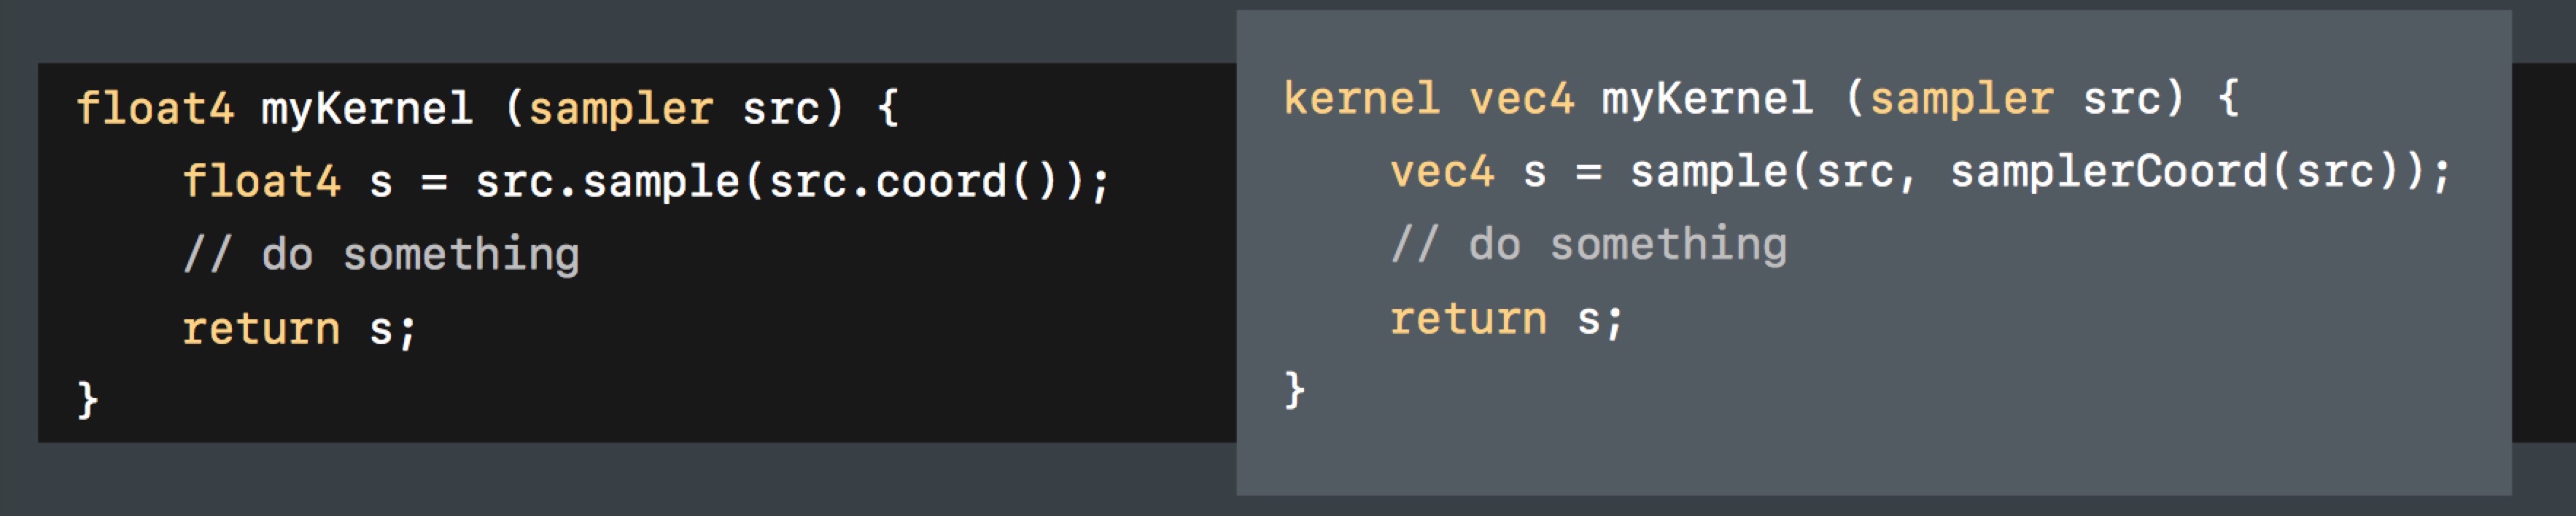
kernel vec4 vignetteKernel(__sample image, vec2 center, float radius, float alpha)
{
	// 计算出当前点与中心的距离
	float distance = distance(destCoord(), center) ;
	// 根据距离计算出暗淡程度
	float darken = 1.0 - (distance / radius * alpha);
	// 返回该像素点最终的色值
	image.rgb *= darken;
	return image.rgba;
}
转换成 Metal 应该是:Vignette.metal :
#include <metal_stdlib>
using namespace metal;

#include <CoreImage/CoreImage.h> // includes CIKernelMetalLib.h

extern "C" { namespace coreimage {
    float4 vignetteMetal(sample_t image, float2 center, float radius, float alpha, destination dest) {
        // 计算出当前点与中心的距离
        float distance2 = distance(dest.coord(), center);

        // 根据距离计算出暗淡程度
        float darken = 1.0 - (distance2 / radius * alpha);
        // 返回该像素点最终的色值
        image.rgb *= darken;

        return image.rgba;
    }
}}
这里有几个改变点逐一说下:
#include <metal_stdlib>
using namespace metal;

#include <CoreImage/CoreImage.h> // includes CIKernelMetalLib.h

extern "C" { namespace coreimage {
}}
这里需要引入对应的库,以及命名空间。因为系统内部的实现大致是这样的:
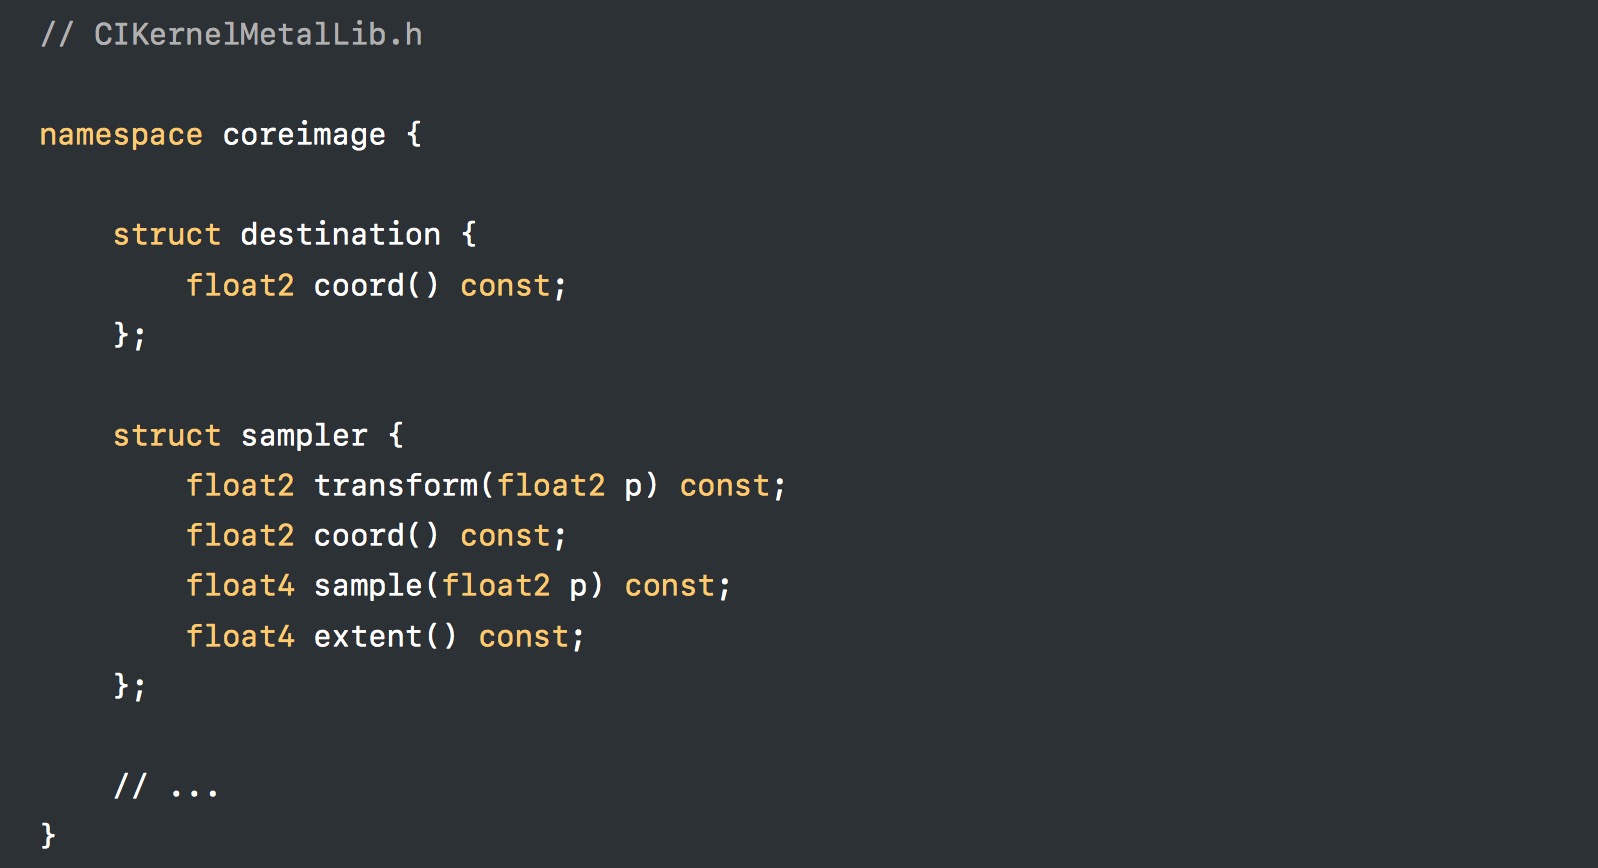
这基本是固定的格式,保持就好。
然后就是特定的修改:
- __sample —> sample_t
- vec2 — > float2
- destCoord() —> dest.coord()
- vec4 —> float4
这里注意,Metal 不支持 vec 类型,参数类型都需要转成浮点值类型。
另外,入参这里,多了一个 destination dest,这个对应 CIColorKernel 是可选的,因为并不一定要获取当前的坐标,正常像素值就够了。
如果要带的话,它是隐式的,必须放在参数列表最后一个,无须我们传参,系统自动赋值。这点需要额外注意!
至此,shader 的编写就结束了,也是很好理解。
Compile and link Metal shader file
至于编译,Xcode 默认是不会帮我们编译 CIKernel 对应的 Metal 文件,需要我们显示的去设置。
具体步骤如下:
Build Settings 里头找到 Other Metal Compiler Flags,添加值:-fcikernel

然后新增一个自定义配置

对应的 Key 为: MTLLINKER_FLAGS,value 为:-cikernel

PS:
如果没添加对应的编译选项,下一步初始化 CIKernel 的时候,会失败。
Initialize CIKernel
这里同样对比旧的创建方式,
NSBundle *bundle = [NSBundle bundleForClass: [self class]];
NSURL *kernelURL = [bundle URLForResource:@"Vignette" withExtension:@"cikernel"];

NSError *error;
NSString *kernelCode = [NSString stringWithContentsOfURL:kernelURL
                                                encoding:NSUTF8StringEncoding
                                                   error:&error];
NSArray *kernels = [CIColorKernel kernelsWithString:kernelCode];
customKernel = [kernels objectAtIndex:0];
只需要改为:
NSURL *kernelURL = [[NSBundle mainBundle] URLForResource:@"default" withExtension:@"metallib"];
NSError *error;
NSData *data = [NSData dataWithContentsOfURL:kernelURL];
customKernel = [CIColorKernel kernelWithFunctionName:@"vignetteMetal"
                                fromMetalLibraryData:data
                                               error:&error];
初始化方法不一样,在使用上是一致的。
至此,通过 Metal 自定义 CIFilter 的流程,已经全部走通了。对旧有的修改很小。
这里额外提一点,UIImageView 针对 CIImage 有做优化,如果一个 UIImage 是通过 UIImage.init(ciImage:) 这种方式创建的,
设置到 UIImageView 上的时候,UIImageView 会在 GPU 上执行 Core Image 相关操作。GPU 处理很高效,并且能释放 CPU 压力。
所以,实时调整 Filter 的时候,也可以借助 UIImageView 来直接显示,效率很高:
@interface MetalKernelViewController ()

@property (strong, nonatomic) MetalKernelFilter *vignetteFilter;
@property (strong, nonatomic) CIImage *inputImage;
@property (strong, nonatomic) IBOutlet UIImageView *imageView;

@end

@implementation MetalKernelViewController

- (void)viewDidLoad {
    [super viewDidLoad];
    // Do any additional setup after loading the view.

    // 初始化 Filter
    self.vignetteFilter = [[MetalKernelFilter alloc] init];
    NSURL *imageURL = [[NSBundle mainBundle] URLForResource:@"vignetteImage" withExtension:@"jpg"];
    self.inputImage = [CIImage imageWithContentsOfURL:imageURL];
    [self.vignetteFilter setValue:_inputImage forKey:@"inputImage"];

    self.imageView.image = [UIImage imageWithCIImage:self.inputImage];

}

#pragma mark - Action
- (IBAction)alphaChanged:(UISlider *)sender {
    [self.vignetteFilter setValue:@(sender.value) forKey:@"inputAlpha"];
    CIImage *result = _vignetteFilter.outputImage;
    self.imageView.image = [UIImage imageWithCIImage:result];
}

@end
CIRenderDestination
这是一个新增的 API,iOS 11 之后支持,方便渲染到指定的目的地。
目前支持:
- IOSurface
- CVPixelBuffer
- Metal Texture
- OpenGL Texture
- Memory buffer
基本涵盖了所有我们需要用来显示的对象。
比如:
- (instancetype) initWithMTLTexture:(id<MTLTexture>)texture
                      commandBuffer:(nullable id<MTLCommandBuffer>)commandBuffer;
当我们需要执行渲染的时候,就可以使用:
- (nullable CIRenderTask*) startTaskToRender:(CIImage*)image
                               toDestination:(CIRenderDestination*)destination
                                       error:(NSError**)error NS_AVAILABLE(10_13, 11_0);
当然,你可能有发现,旧的 API 也是支持渲染到指定目的地的,比如:
- (void)render:(CIImage *)image
toCVPixelBuffer:(CVPixelBufferRef)buffer NS_AVAILABLE(10_11,5_0);
那么,新的 API 有什么优势呢?我具体罗列了以下几点:
- 如果渲染失败,会立即返回错误信息,便于排查问题,旧的是不支持。
- 另外,渲染时,可以额外指定结果的一些属性,比如是否翻转,颜色空间,alpha 混合模式等。不需要额外的操作,性能高。
- 另外,支持这些属性后,不需要额外创建多个 CIContext。之前处理的话,有的属性和具体的 CIContext 关联,导致配置不同参数的时候,需要依赖多个。现在只要一个就可以了。
- 性能更好,速度快。旧的 API,需要等到所有提交到 GPU 的渲染命令,执行完毕后,才执行新的渲染操作。新的 API,当 CPU 提交完所有命令到 GPU 后,就可以开始执行新的,不需要等到 GPU 处理完。CPU 和 GPU 之间的协同工作更加高效。
They used to return after all the render on the GPU is completed.
But now with this new API, it will return as soon as the CPU has finished issuing all the work for the GPU.
And without having to wait for the GPU work to finish.
So we think this new flexibility will now allow you to pipeline all your CPU and GPU work much more efficiently.
额外支持的属性:
@property CIRenderDestinationAlphaMode alphaMode;
@property (getter=isFlipped) BOOL flipped;
@property (getter=isDithered) BOOL dithered;
@property (getter=isClamped) BOOL clamped;
@property (nullable, nonatomic) CGColorSpaceRef colorSpace;
@property (nullable, nonatomic, retain) CIBlendKernel* blendKernel;
@property BOOL blendsInDestinationColorSpace;
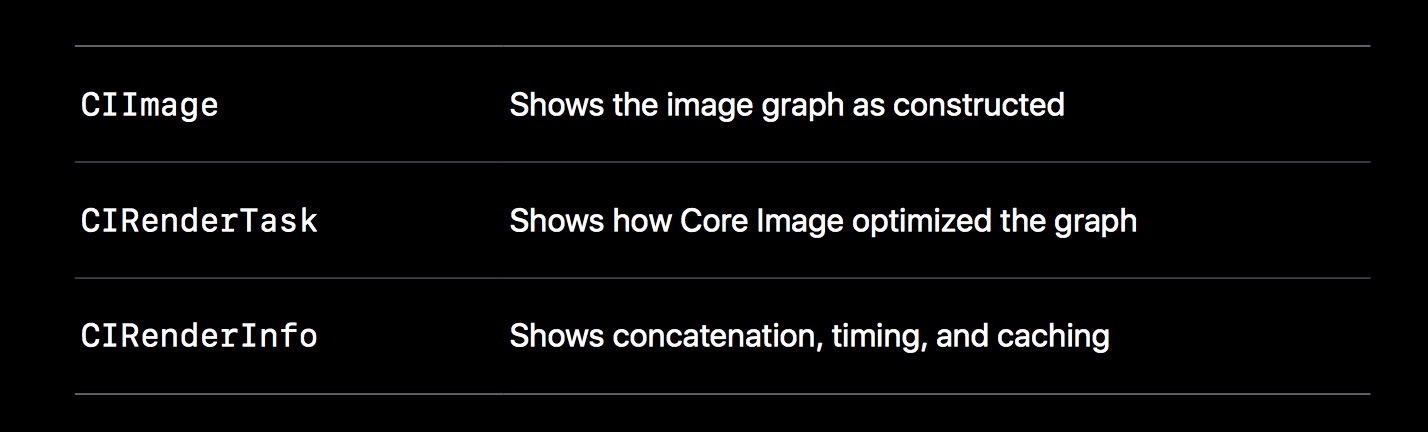
调试信息
这里主要包含两点:
- CIRenderInfo
- Quick Look
CIRenderInfo
CIRenderInfo 是新增的对象,它里面包含了一些有用的信息,比如 kernel 执行耗时,当前有多少数量的像素参与处理等。
// An Xcode quicklook of this object will show a graph visualization of the render
// with detailed timing information.
NS_CLASS_AVAILABLE(10_13, 11_0)
@interface CIRenderInfo : NSObject
{
    void *_priv;
}

// This property will return how much time a render spent executing kernels.
@property (readonly) NSTimeInterval kernelExecutionTime;

// This property will return how many passes the render requires.
// If passCount is 1 than the render can be fully concatinated and no
// intermediate buffers will be required.
@property (readonly) NSInteger passCount;

// This property will return how many pixels a render produced executing kernels.
@property (readonly) NSInteger pixelsProcessed;

@end
Quick Look
Core Image 对很对对象新增了 Quick Look 支持,方便调试查看效果。
关于调试信息这点,前两篇文章其实有提到其他方式,只是都没有 Quick Look 来得方便。
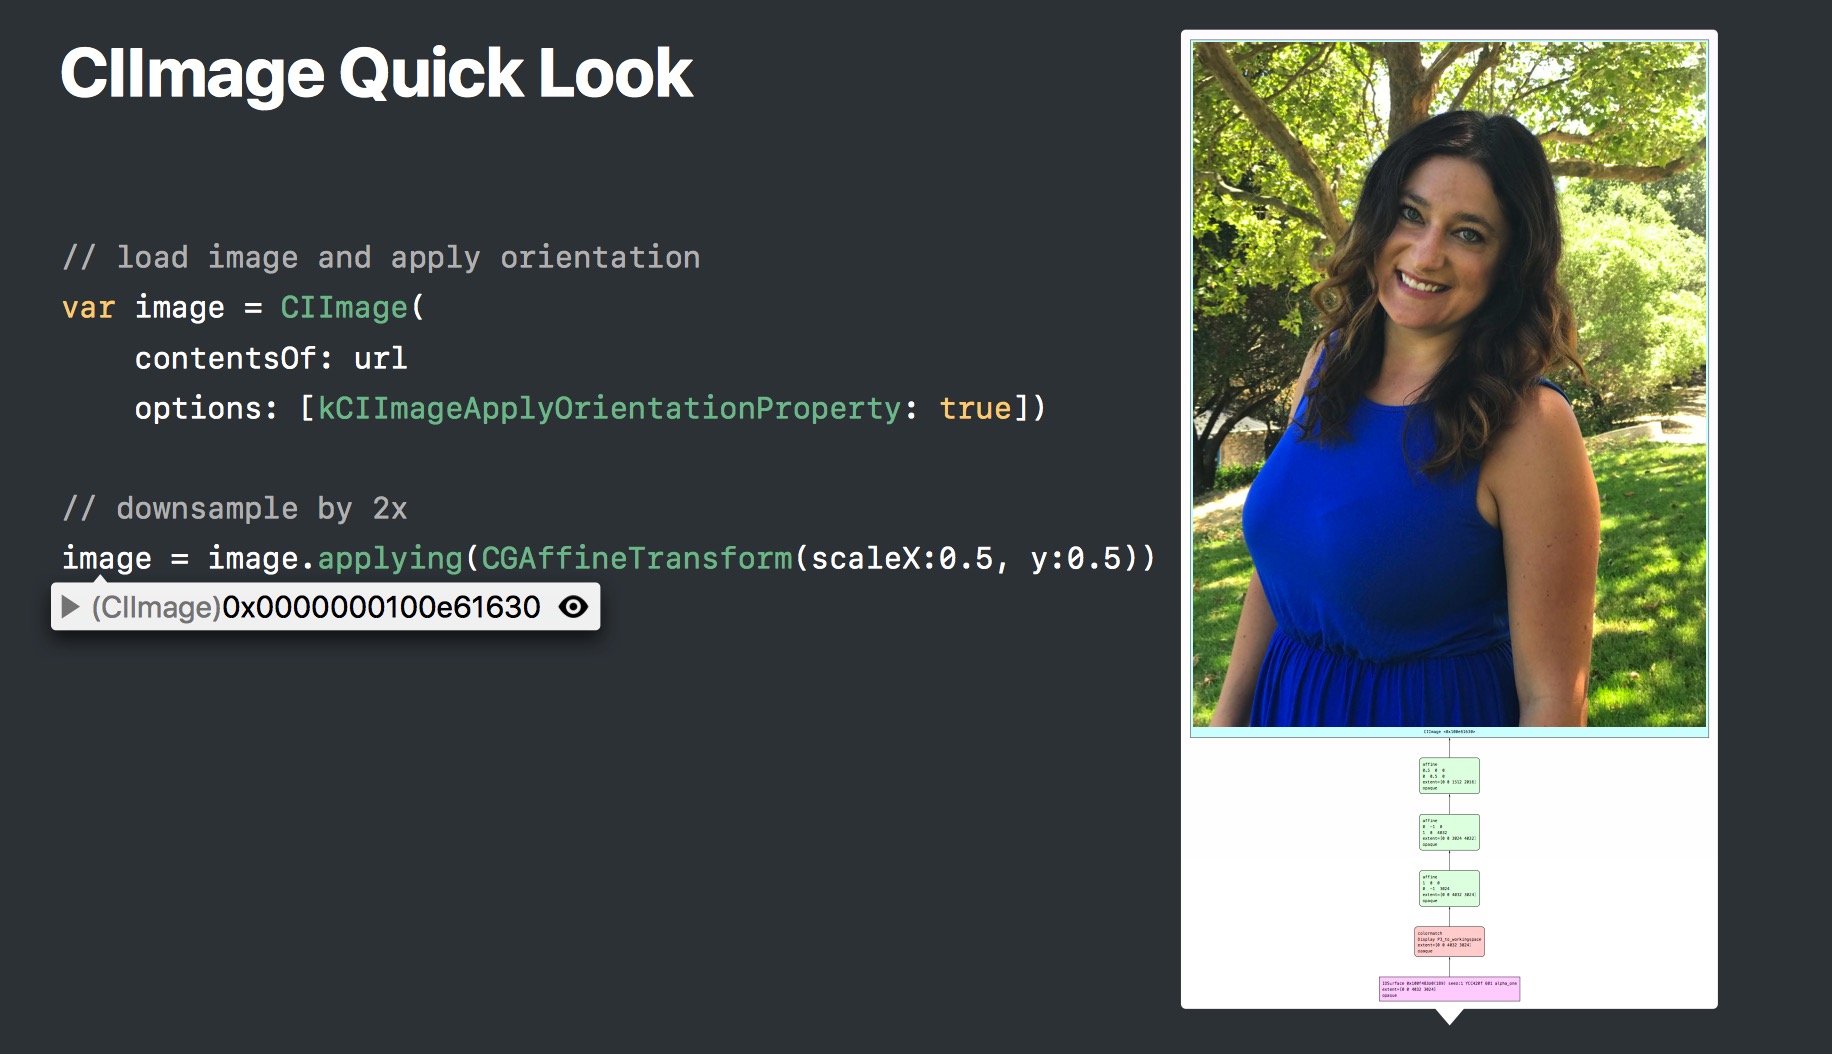
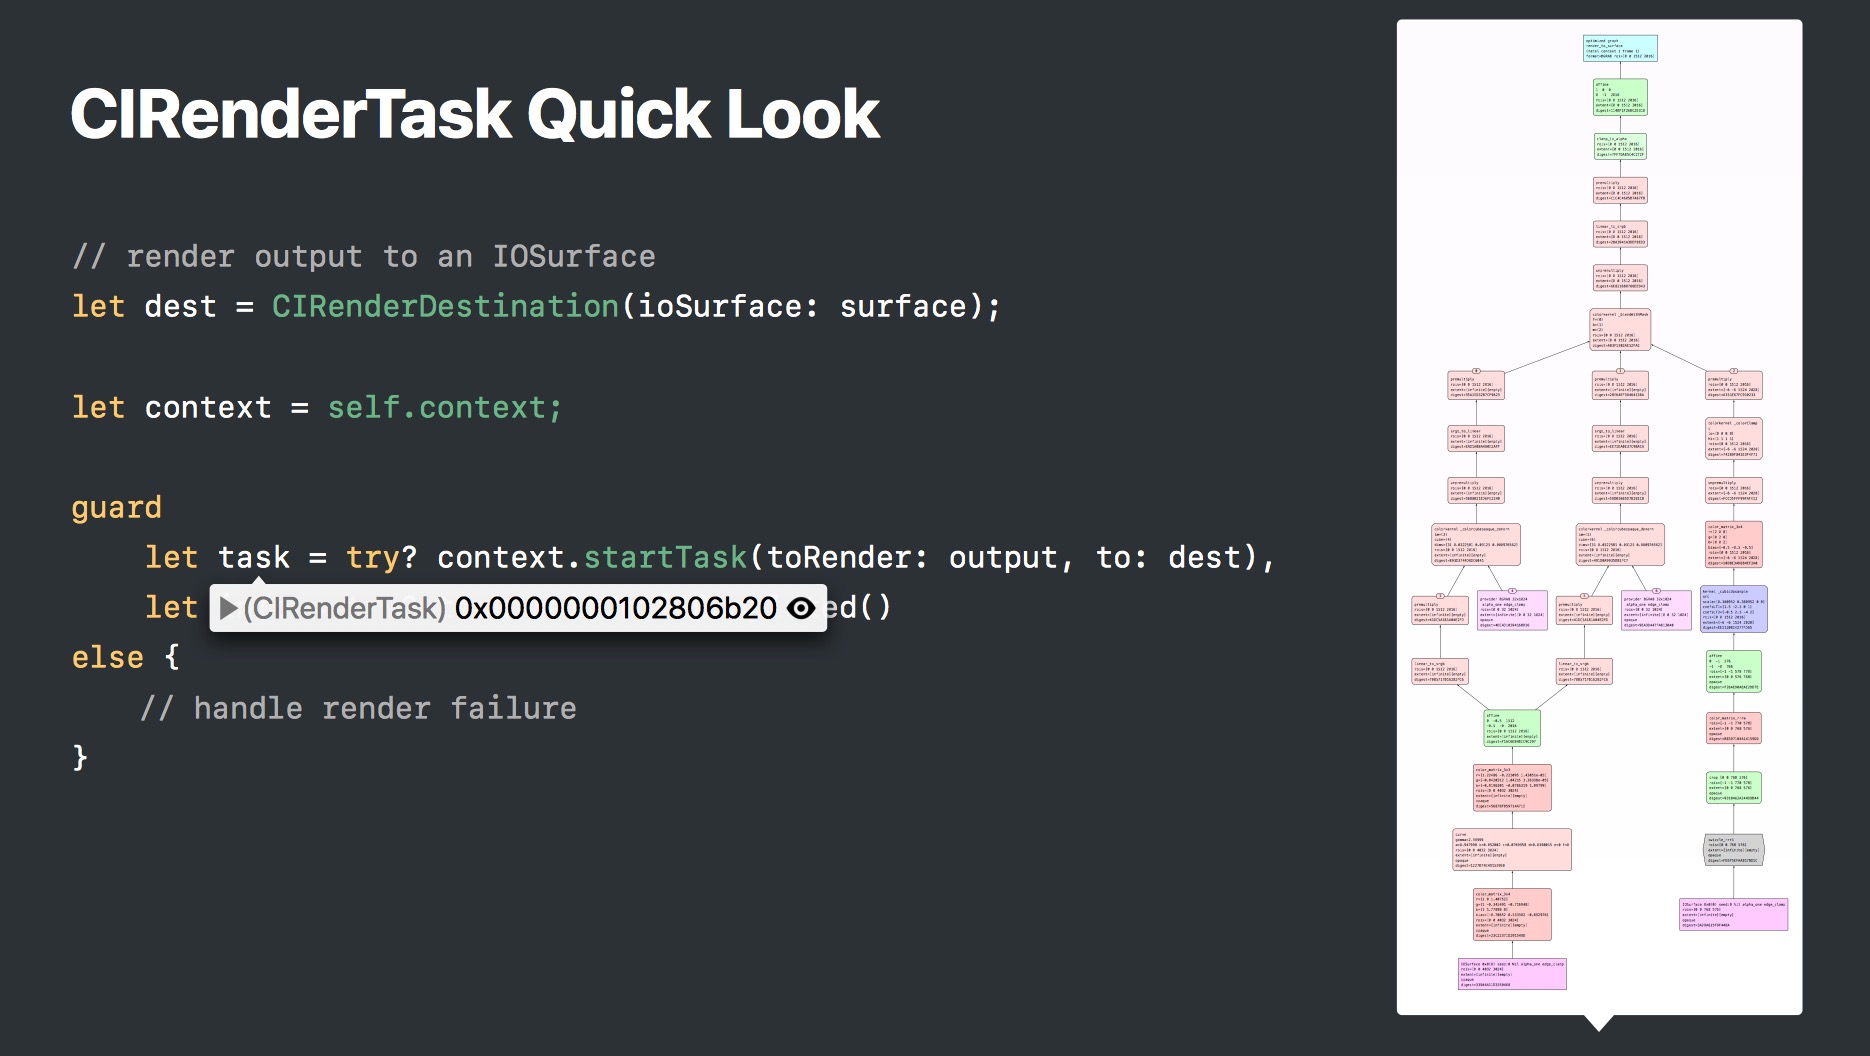
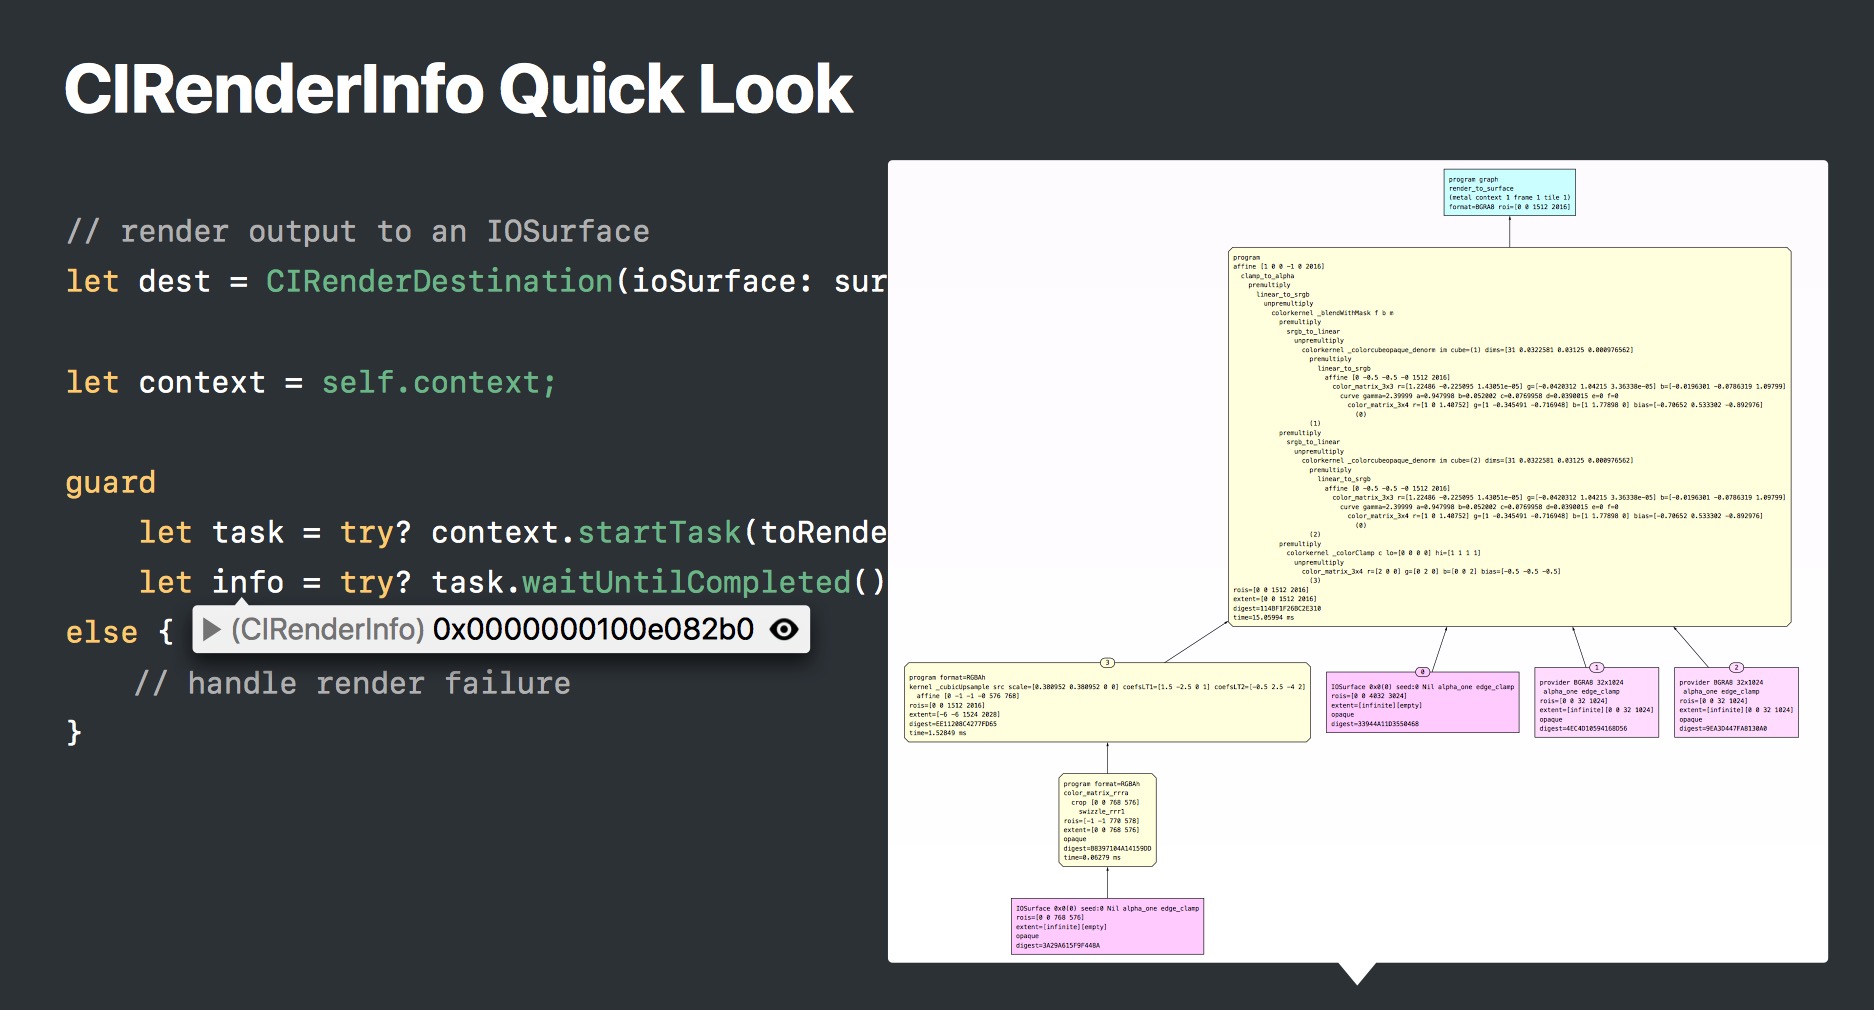
图表都支持放大查阅,具体的大家可以实际查阅。信息还是很有用的,包含多个滤镜是怎么组合的等等细节。
新功能
New Filter
现在内置了 196 个 filters
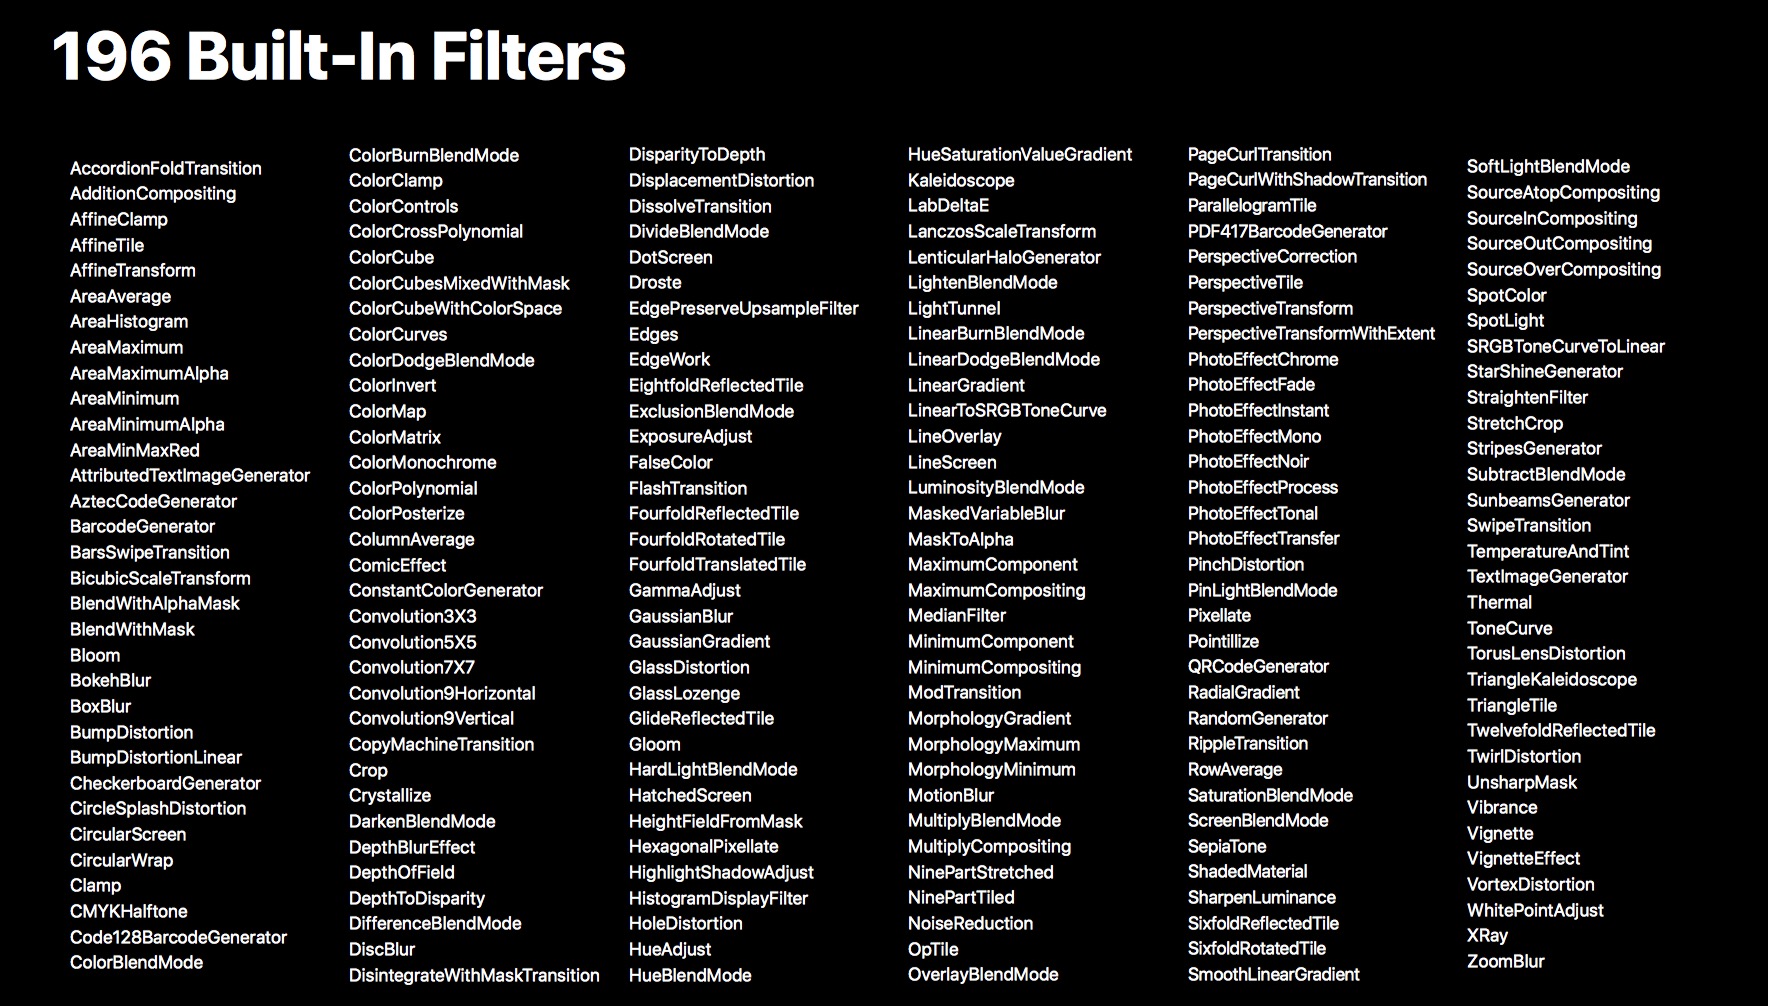
内置的滤镜,有新增,也有性能优化。这里不展开讲。
一般都是用到的时候,去查找是否有合适的内置滤镜,而不是一开始就把这近 200 个滤镜都掌握下来。
具体的可以查阅: Core Image Filter Reference
CIBarcodeDescriptor
App 现在支持各种各样的条码扫描,识别。
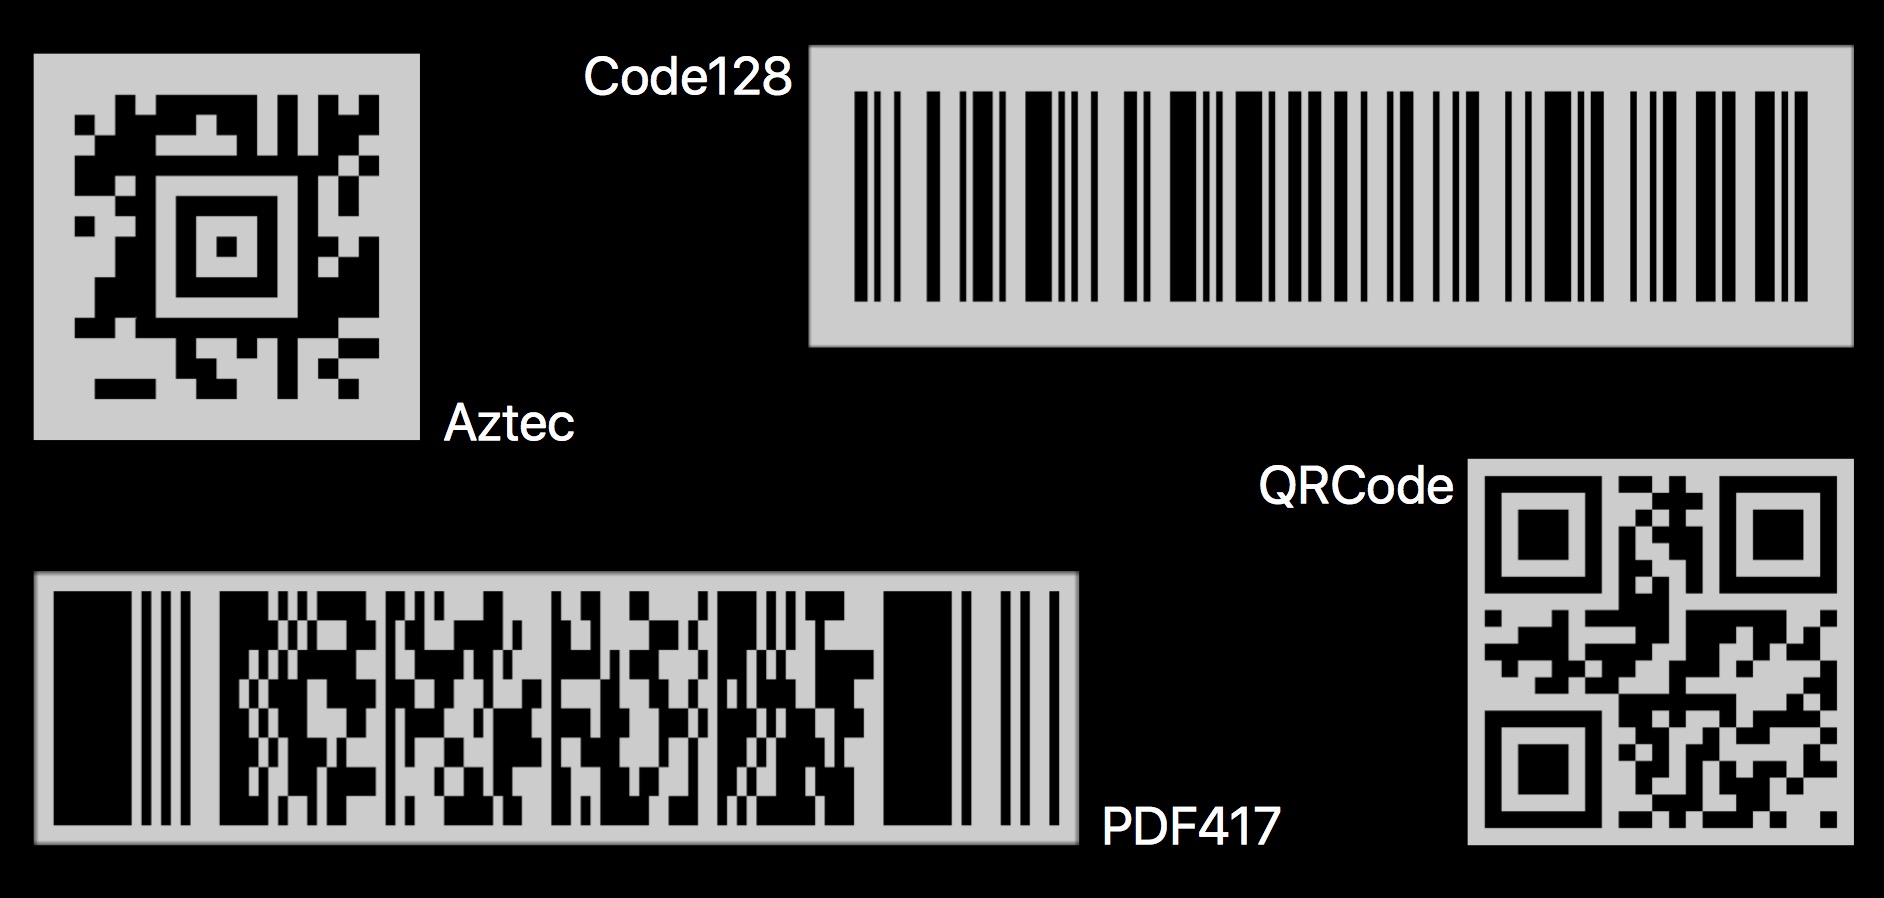
并且,各个不同的框架,通过新引入的 CIBarcodeDescriptor,能够协调工作。
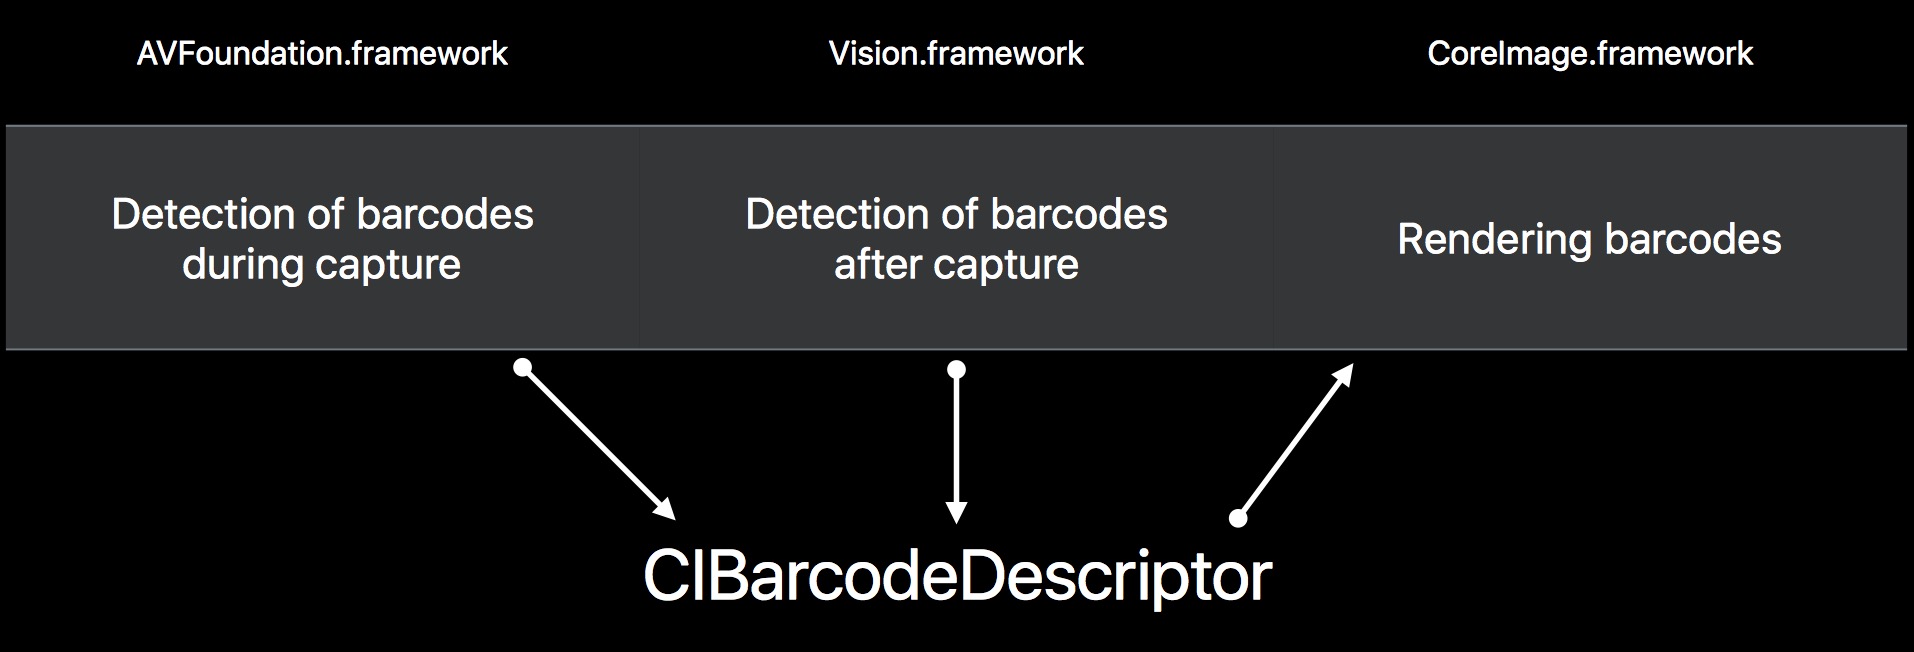
这里,可以通过 AVFoundation 框架,实时获取图像,并检测识别得到 CIBarcodeDescriptor 对象。
// Get a CIBarcodeDescriptor from AVFoundation.framework
class MyMetadataOutputObjectsDelegate: NSObject, AVCaptureMetadataOutputObjectsDelegate
{
    func metadataOutput(_ output: AVCaptureMetadataOutput,
                        didOutput metadataObjects: [AVMetadataObject],
                        from connection: AVCaptureConnection) {
        if let mrc = metadataObjects.first as? AVMetadataMachineReadableCodeObject,
          let descriptor = mrc.descriptor {
              print(descriptor)
        }
    }
}
当然,对于静态图片,或者录制好的视频文件,也可以通过 Vision 框架检测识别得到 CIBarcodeDescriptor 对象。
// Detect a CIBarcodeDescriptor using Vision.framework
func descriptorFromImage(_ image: CIImage) -> CIBarcodeDescriptor?
{
    // Create the request and request handler
    let requestHandler = VNImageRequestHandler(ciImage: image, options: [:])
    let request = VNDetectBarcodesRequest();

    // Send the request to the handler
    try? requestHandler.perform([request])

    // Get the observation
    let firstResult = request.results?.first
    return firstResult?.barcodeDescriptor
}
而获取到的 CIBarcodeDescriptor,则可以通过 Core Image 进行渲染,得到对应的条码图像。
// Create an image for a CIBarcodeDescriptor using CoreImage.framework
func imageFromBarcodeCodeDescriptor(_ descriptor: CIBarcodeDescriptor) -> CIImage?
{
    return CIFilter(name: "CIBarcodeGenerator",
                    withInputParameters: ["inputBarcodeDescriptor" : descriptor])
                      ?.outputImage
}
PS:
另外,CIBarcodeDescriptor 提供了许多有用的属性,比如 errorCorrectedPayload,maskPattern 等,便于获取条码的各种信息。
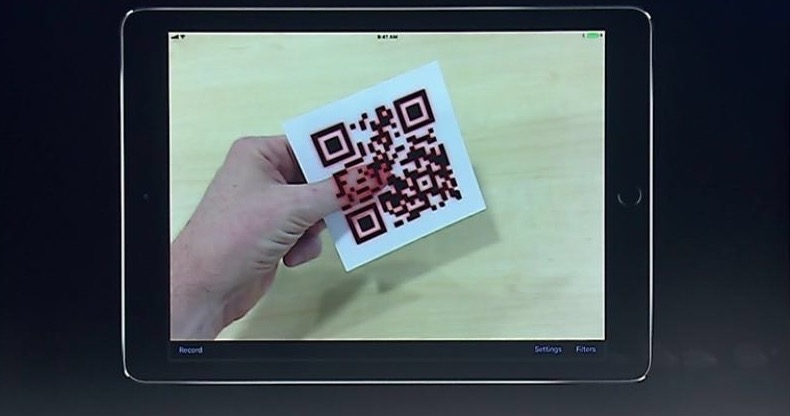
通过这几个框架的无缝结合,可以做一些有趣的事情。
官方展示了这么一个 Demo,它可以从视频帧中,提取出条码,然后重新渲染到条码上,加上红色遮罩,突出效果。这里有两点很惊艳。
- 识别到的条码已经重新渲染的位置都很准确。
- 注意看手指遮挡的部分,也能渲染出来。
Using Core Image with Vision
这个部分,有种捆绑销售的感觉~强行推一波新加入的 Vision。
我们知道 Core Image 可以对图像进行处理,比如裁剪,旋转,灰度等等。
而 Apple 新推出的 Vision 框架,在分析图像方面十分擅长,能提取出很多有用的信息。
所以它们配合在一起能做一些很棒的事情,比如这里介绍了一个,从一组图片中,生成一张不包含某个对象的图片。
Photo from Video with Removal of Unwanted Objects
具体如下图所示:
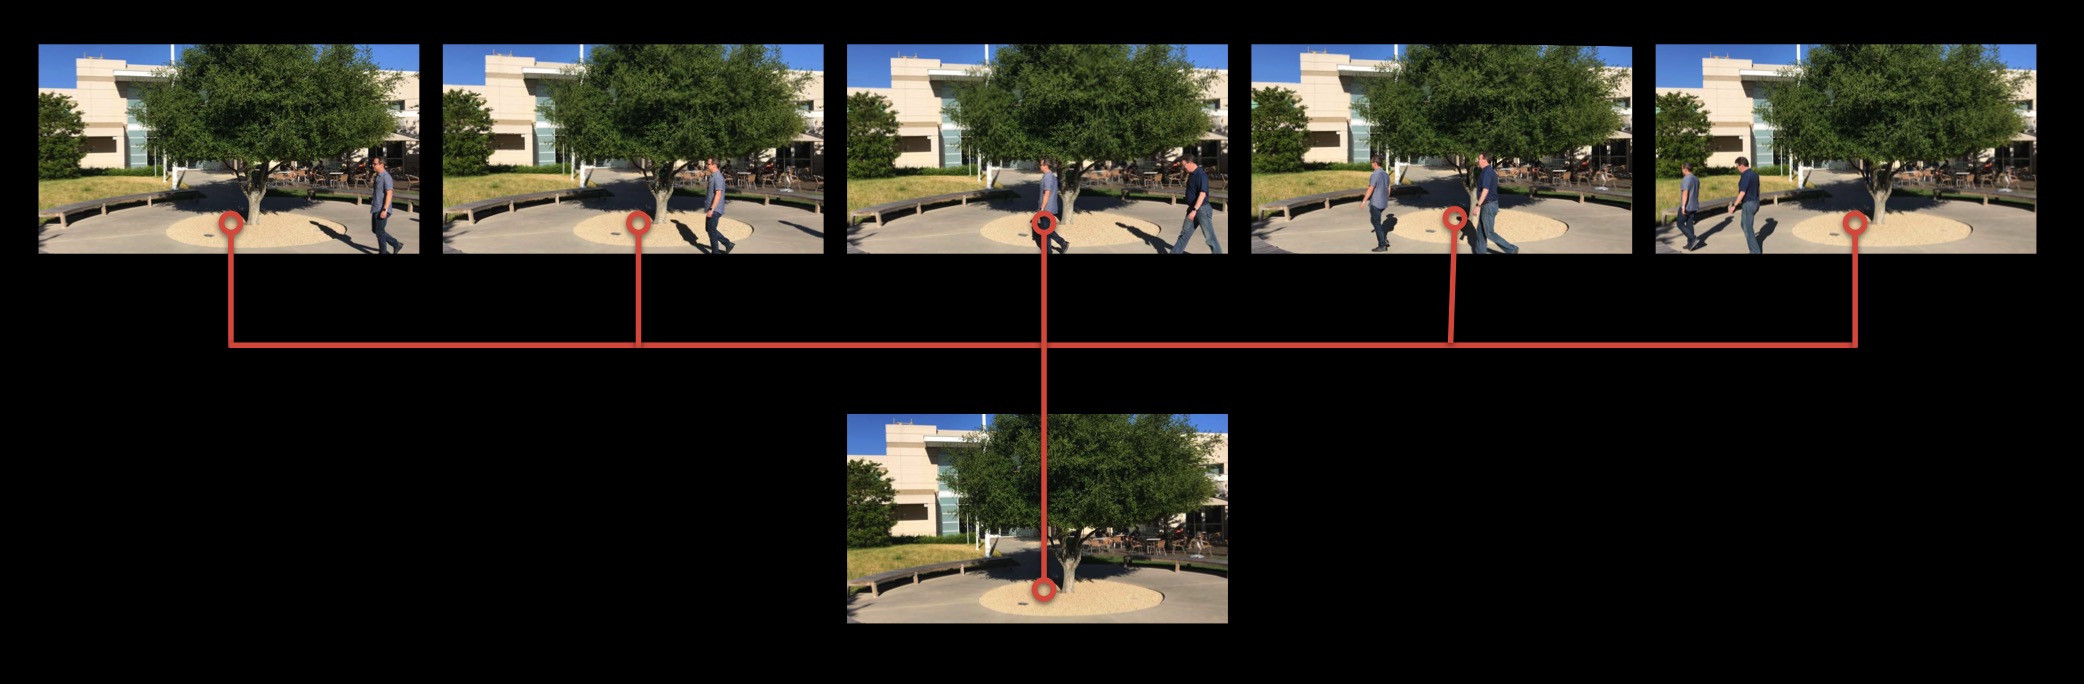
从五张同个场景的图片,通过 Vision 和 Core Image 结合,实现去除图片上移动的人物。
实现这个功能的具体步骤如下:
从视频中提取序列帧。这里简单的使用 AVFoundation 就能实现,我们可以得到几个对应的 CIImage。
图像对齐校正。提取出来的几张图片,可能因为拍摄设备的抖动,导致画面并不是完全一致,这时候就需要后期的调整。Vision 为我们提供了一个类 VNHomographicImageRegistrationRequest,专门用来做图像配准的。通过对比两张图片,能得到一个“对齐矩阵”,这样一张图片就能向另一张图片对齐。
An image analysis request that determines the perspective warp matrix needed to align the content of two images.
Create and perform a homographic image registration request to align content in two images through a homography. A homography is an isomorphism of projected spaces, a bijection that maps lines to lines.
具体代码如下:
func homographicTransform(from image: CIImage, to reference: CIImage) -> matrix_float3x3? {
  // Create the request and request handler
  let request = VNHomographicImageRegistrationRequest(targetedCIImage: image);
  let requestHandler = VNImageRequestHandler(ciImage: reference, options: [:]);

  // Send the request to the handler
  try? requestHandler.perform([request]);

  // Get the observation
  guard let results = request.results,
        let observation = results.first as? VNImageHomographicAlignmentObservation
  else {
      return nil
  }
  return observation.warpTransform
}
得到的矩阵,再传入 CIFilter 中,做对齐,对应的 kernel 脚本如下 :
// Core Image Metal kernel to apply a homography matrix
float2 warpHomography(float3x3 h, destination dest)
{
  	float3 homogeneousDestCoord = float3(dest.coord(), 1.0);
  	float3 homogeneousSrcCoord = h * homogeneousDestCoord;
  	float2 srcCoord = homogeneousSrcCoord.xy / max(homogeneousSrcCoord.z, 0.000001);
  	return srcCoord;
}
经过这个操作后,得到的 5 张图片,都是对齐过的,场景都是一致的。
但是画面上,人物的位置是不均匀分布的,所以要使用中位算法,取出最终的画面。
也就是每个像素点,都是5个图片一起分析,取出相同占比最高的那个像素值,结合成一个新的画面,就能剔除额外的人物。具体脚本如下:
// Core Image Metal kernel to return the median of 5 images
inline void swap(thread float4 &a, thread float4 &b)
{
	float4 tmp = a; a = min(a,b); b = max(tmp, b); // swap sort of two elements
}

float4 medianReduction5(sample_t v0, sample_t v1, sample_t v2, sample_t v3, sample_t v4)
{
	// using a Bose-Nelson sorting network
	swap(v0, v1); swap(v3, v4); swap(v2, v4); swap(v2, v3); swap(v0, v3); swap(v0, v2); 	swap(v1, v4); swap(v1, v3); swap(v1, v2);
	return v2;
}